Install on Cloudflare with Wrangler
Deploy the NORG edge router from your terminal. No Git connection in Cloudflare: clone, set one value, run one command.
1Get your SITE_ID and NORG_SITE_KEY
The worker needs two values that tie it to your NORG site. Get them before you start, because the install asks for both.
- SITE_ID: identifies your site in NORG. It is not secret.
- NORG_SITE_KEY: the secret the worker uses to talk to NORG. It is shown once. NORG stores only a hash, so copy it straight away.
Option A: ask your AI assistant (NORG MCP)
With the NORG connector, ask for the edge site's status. It returns the SITE_ID. Then ask it to rotate the site key to mint a fresh NORG_SITE_KEY. Rotating asks you to confirm first: reply yes, and the new key is shown once.
If the site does not exist yet, ask it to convert the workspace to Sitemap Mirror mode for your domain. That creates the site and starts the first crawl. The Deploy button never changes the site's mode, it only deploys the worker. Free workspaces mirror up to 10 pages, and the cap cannot be raised once the site exists, so say so if you want the full mirror.
Option B: have NORG provide them
Ask your NORG contact. We will send the SITE_ID and a freshly minted NORG_SITE_KEY.
Rotating later: rotating invalidates the old key at once. A worker already running starts getting 401 responses from NORG until you put the new key into its secret and redeploy. It never breaks your site in the meantime: the worker falls back to serving your pages unchanged.
2Clone the repository and deploy
You need Node.js and a Cloudflare account that holds your zone.
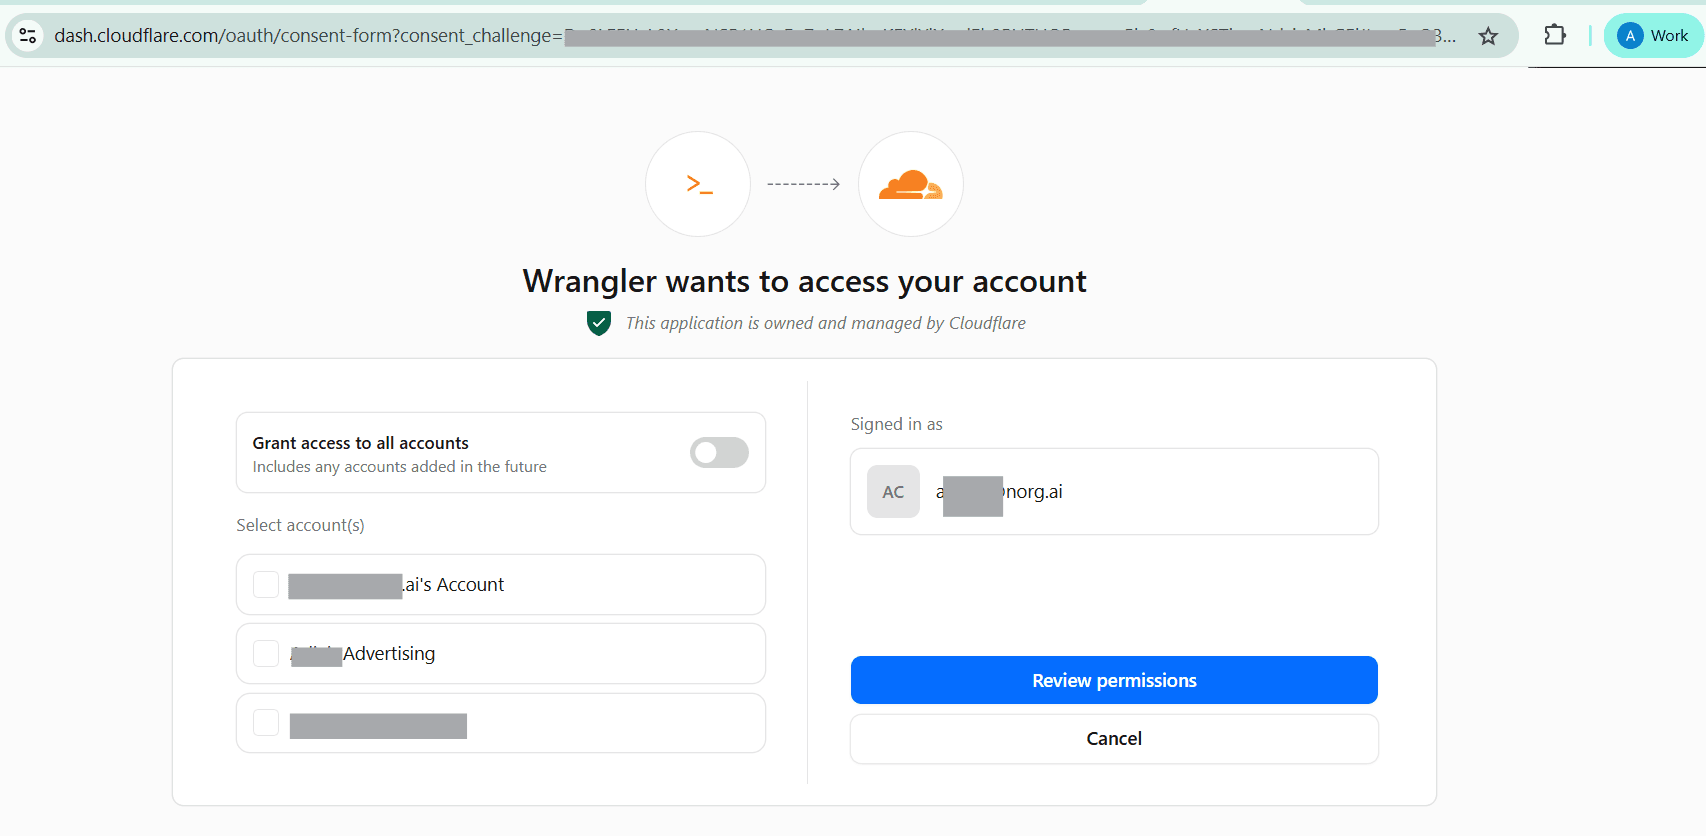
git clone https://github.com/norgai/norg-edge-mirror-cloudflare-deploy cd norg-edge-mirror-cloudflare-deploy npm install npx wrangler loginnpx wrangler login opens your browser. Tick the account that holds your zone (leave Grant access to all accounts off), click Review permissions, then approve. Wrangler in the terminal confirms you are logged in.
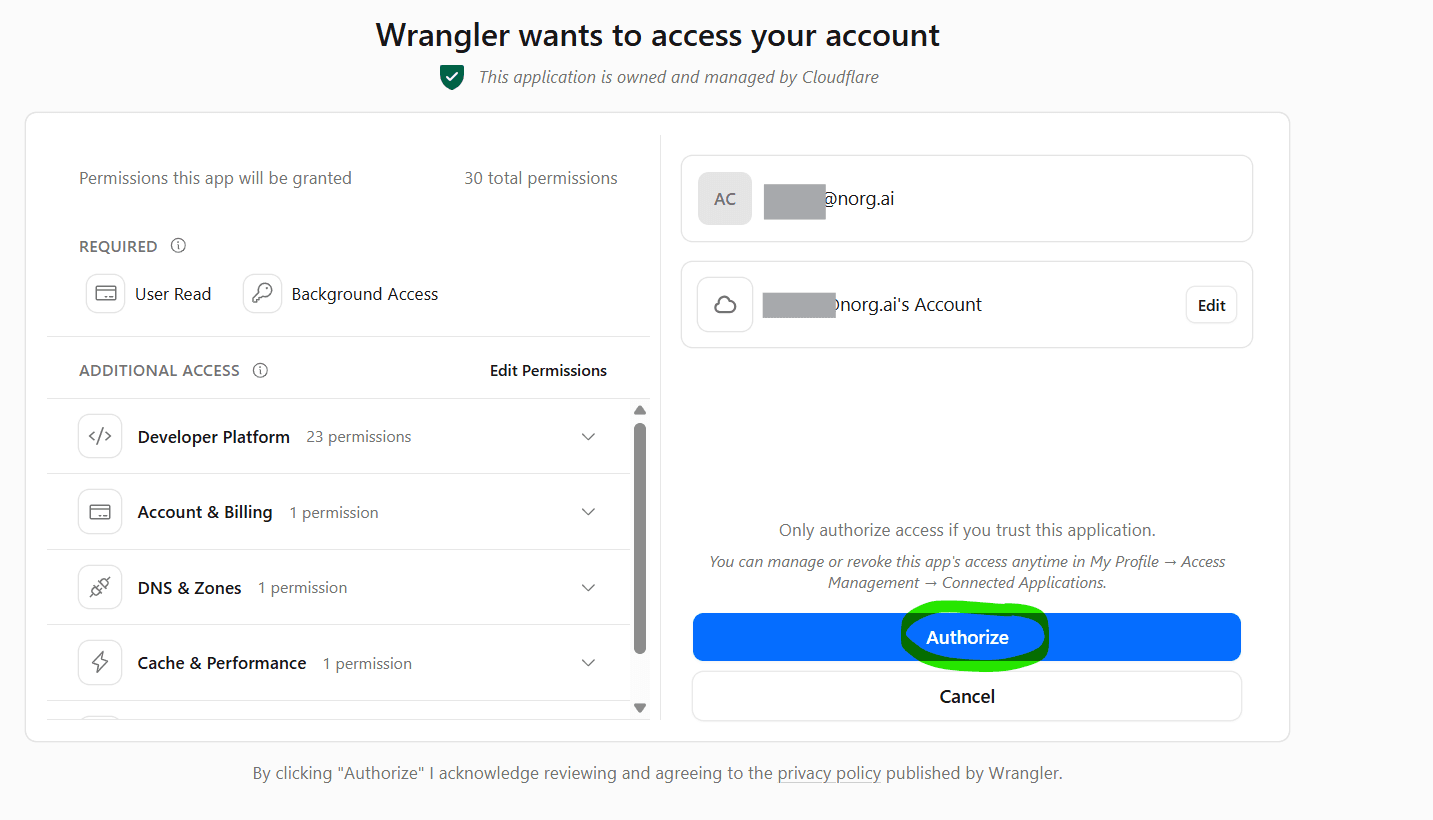
npx wrangler login opens this page. Tick the account that holds your zone, then click Review permissions and approve.The next screen lists the permissions Wrangler will be granted, mostly for Workers. Click Authorize. Once the install is finished you can revoke Wrangler's access: you can manage or revoke this app's access anytime in My Profile → Access Management → Connected Applications. The worker keeps running after you revoke it. You only need to log in again the next time you deploy.
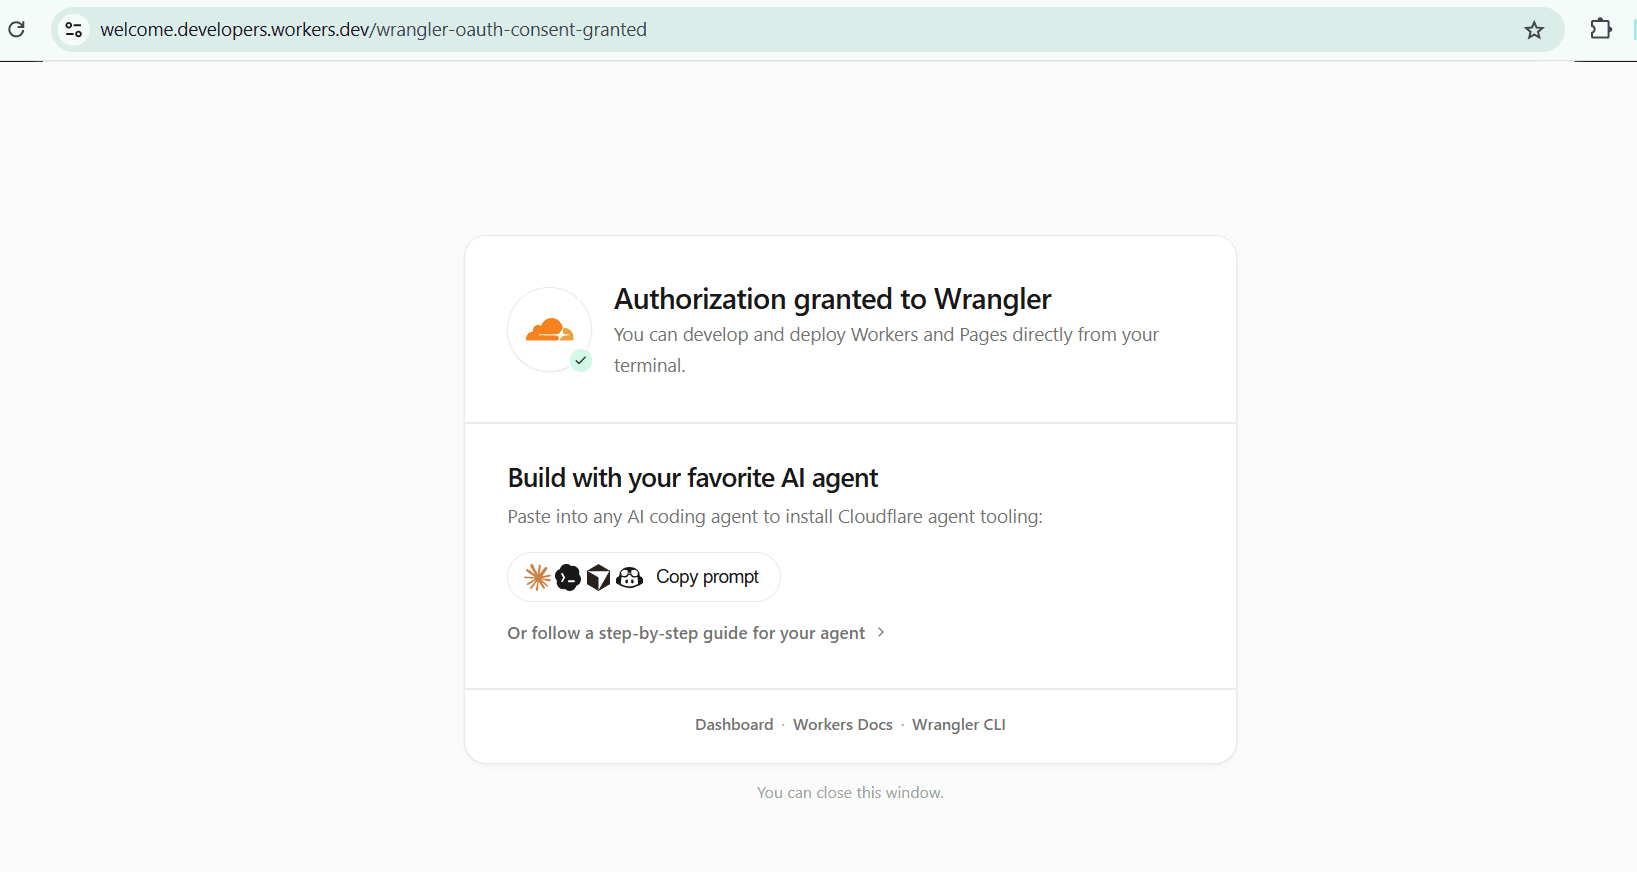
The permissions Wrangler will be granted. Click Authorize.You should see Authorization granted to Wrangler. Close the window and go back to the terminal.
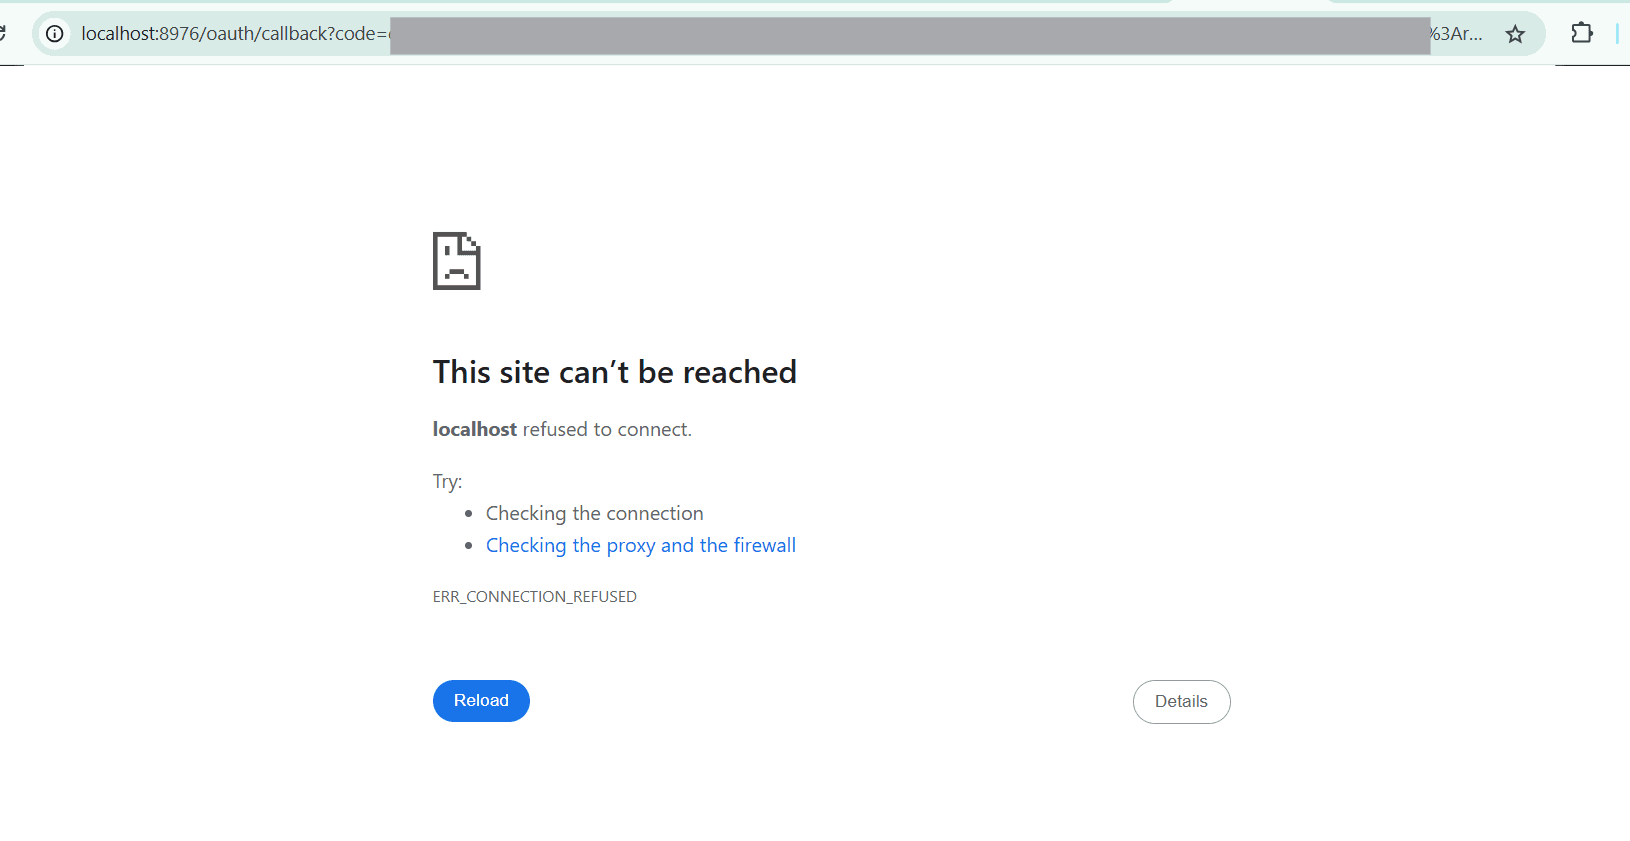
Success: Authorization granted to Wrangler. You can close this window.“This site can't be reached” after you click Authorize? You took too long and Wrangler stopped waiting, so nothing is listening for the reply. Close the tab, run npx wrangler login again in the terminal, and approve the new browser page straight away.
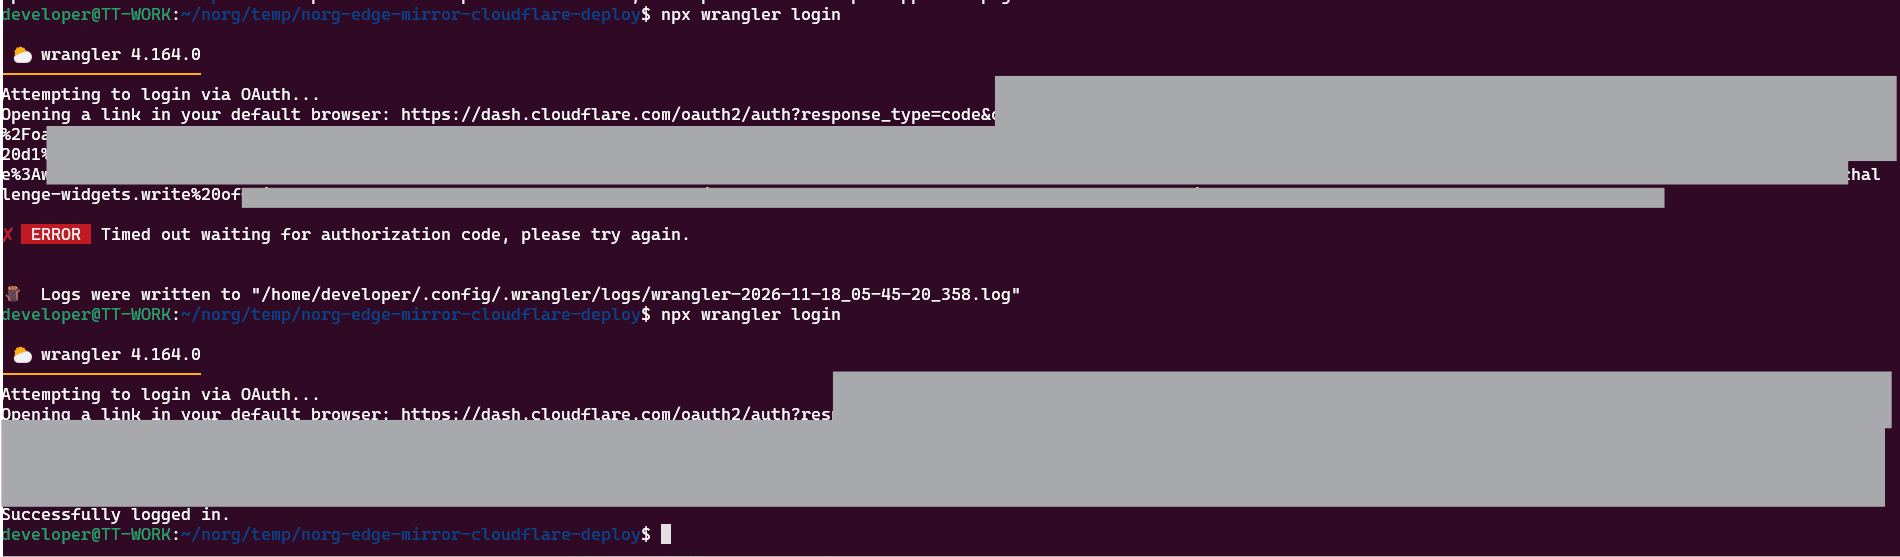
This error after you click Authorize means Wrangler timed out waiting.The terminal shows Timed out waiting for authorization code, please try again. Run npx wrangler login again. The second attempt finishes with Successfully logged in.
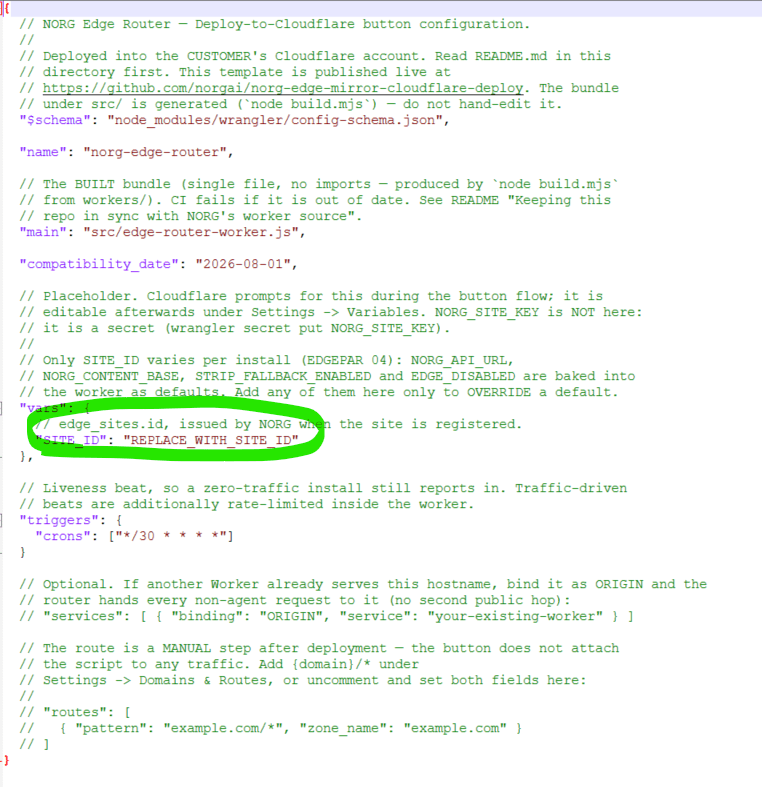
In the terminal: Timed out waiting for authorization code, then a second npx wrangler login that ends in Successfully logged in.Open wrangler.jsonc and replace REPLACE_WITH_SITE_ID with your SITE_ID:
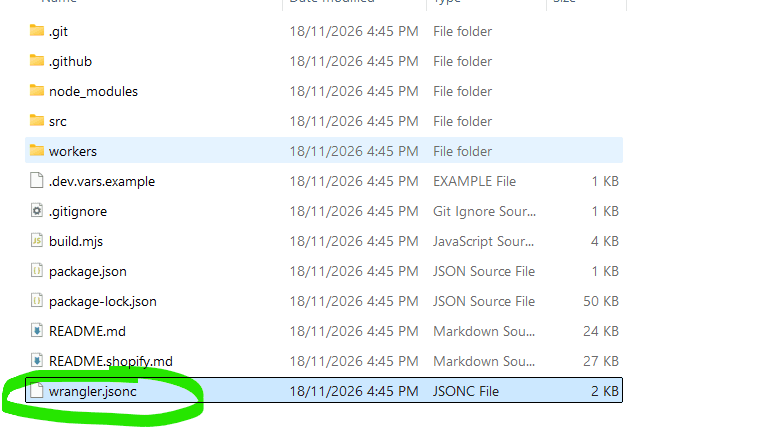
wrangler.jsonc sits in the top folder of the cloned repository. This is the file to edit."vars": { "SITE_ID": "your-site-id-here" } In wrangler.jsonc, replace REPLACE_WITH_SITE_ID in the vars block with your SITE_ID. Leave everything else as it is.Deploy, then store the key as a secret. Wrangler prompts for the value, so it never lands in a file:
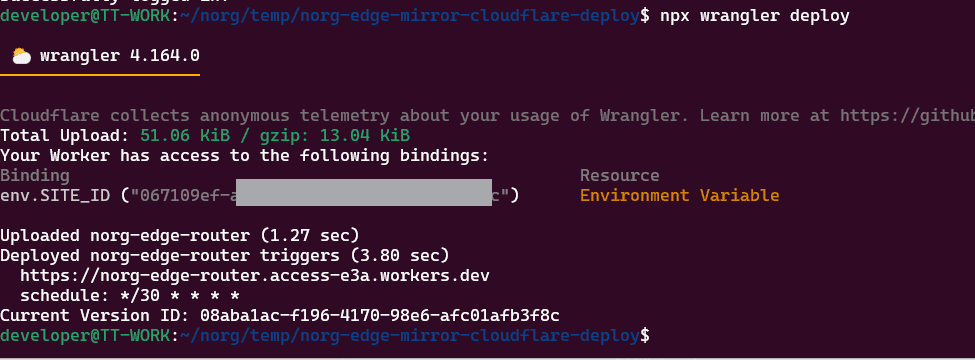
npx wrangler deployA successful deploy lists your SITE_ID as an environment variable and shows the */30 * * * * schedule.
A successful deploy: your SITE_ID is listed as an environment variable and the worker has a 30-minute schedule.npx wrangler secret put NORG_SITE_KEYType NORG_SITE_KEY exactly as shown: it is the secret's name. Paste your key only at the Enter a secret value prompt, where it stays hidden.
Paste your key at the prompt. It is hidden as you type. Success! Uploaded secret NORG_SITE_KEY means it is stored.The worker is deployed but attached to no traffic. The next step attaches it. To update later, pull the repository and run npx wrangler deploy again.
3Attach the worker to your hostname
Deploying does not send any traffic to the worker. You attach it yourself. The hostname must be proxied (orange cloud) in Cloudflare DNS, or the worker never runs.
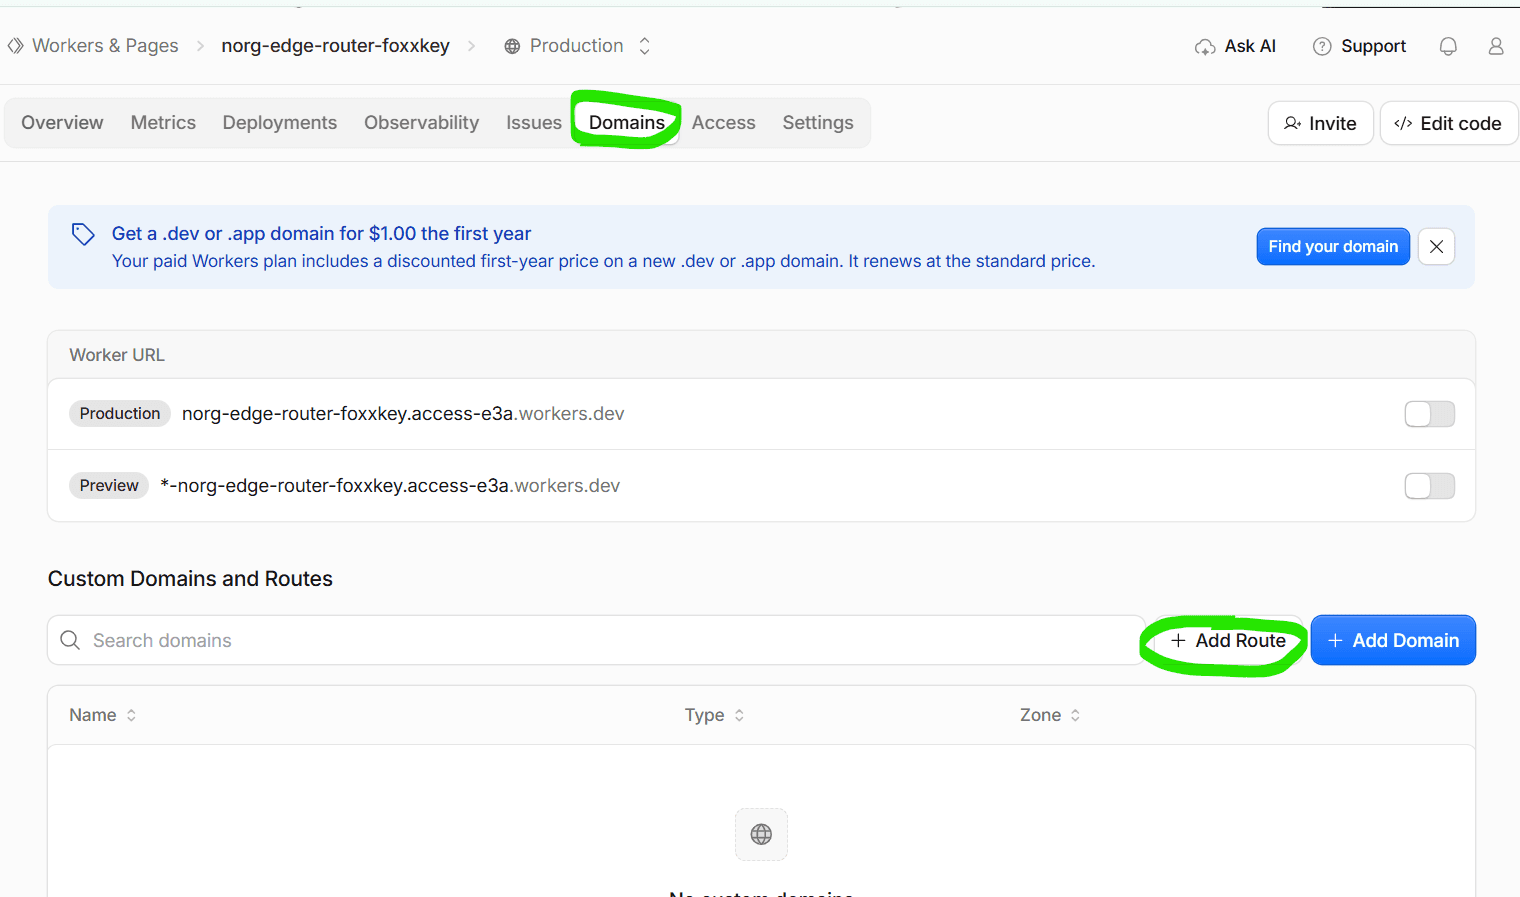
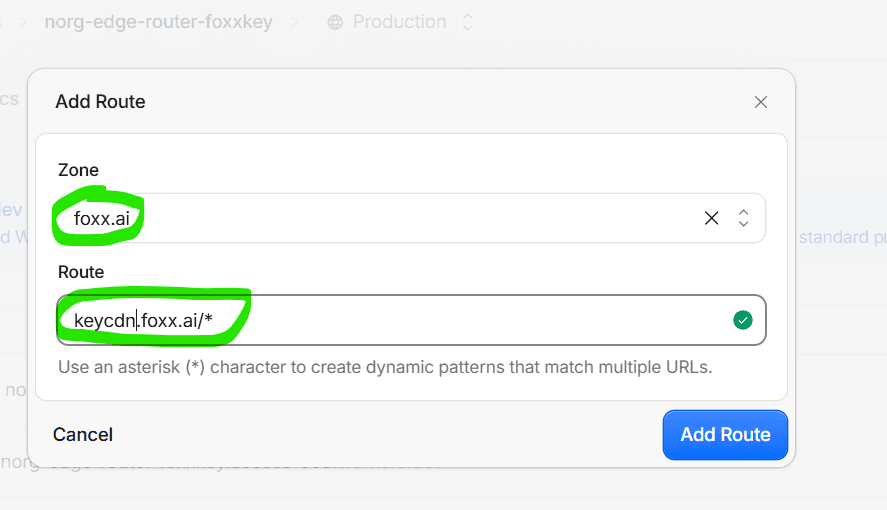
Open the worker, then Domains and Add Route. Choose the Zone and enter the Route as your hostname followed by /*, for example www.example.com/*. Click Add Route.
Domains tab, then Add Route. Choose the zone and enter your hostname followed by /*.Mirroring a whole subdomain space rather than one hostname? Use Add Domain (a custom domain) instead of a route.
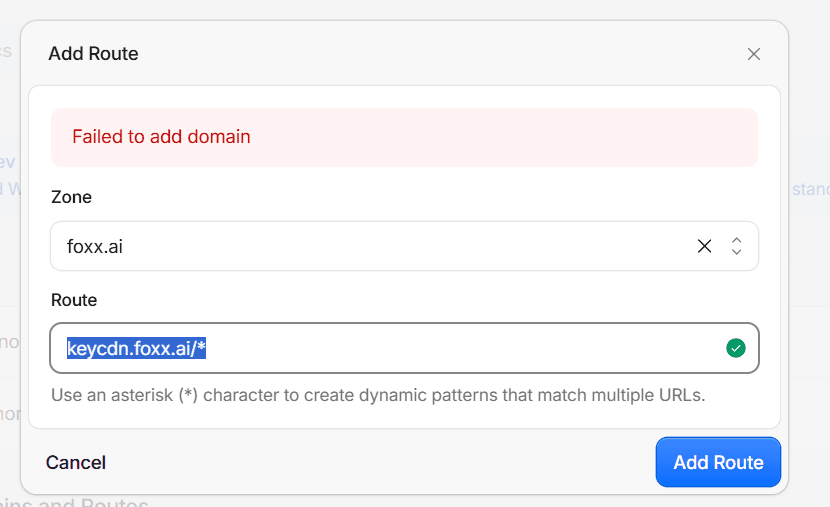
Failed to add domain: see the checks below.Failed to add domain? Another Worker is probably already using that route or domain, so they conflict. Find it under the zone's Workers Routes, then remove it or point it somewhere else. If your own Worker must keep serving the hostname, see installing alongside your own Worker.
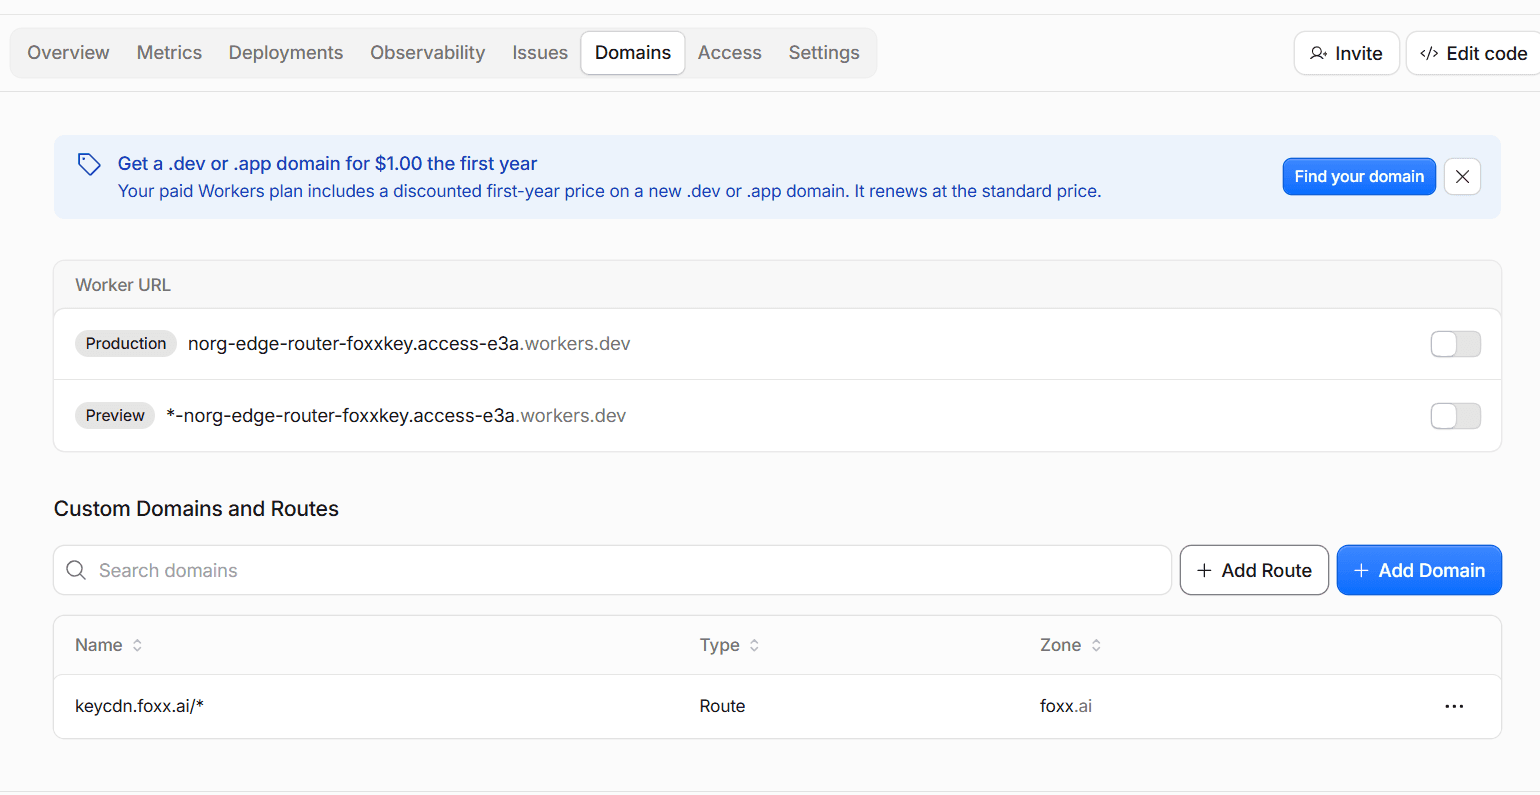
The route now lists against the worker. 4Add route exclusions
Static assets such as scripts, styles and images do not need the worker. An exclusion is a Cloudflare route that points at no worker, so requests to those paths skip it. NORG cannot add exclusions for this install because it holds no Cloudflare token, so you add them yourself.
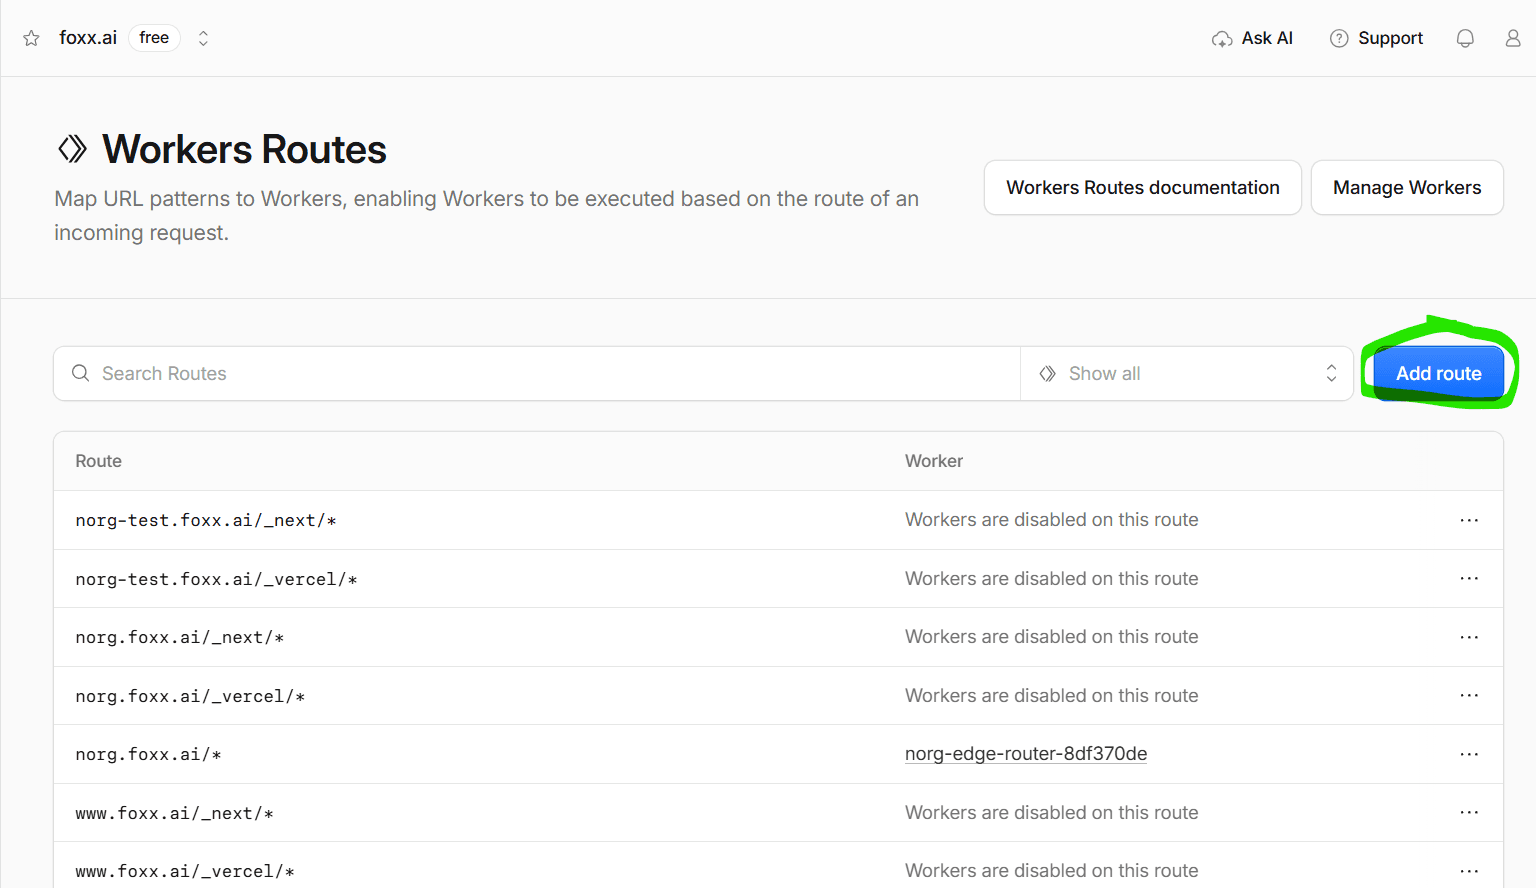
- Open your zone, then Workers Routes and Add route.
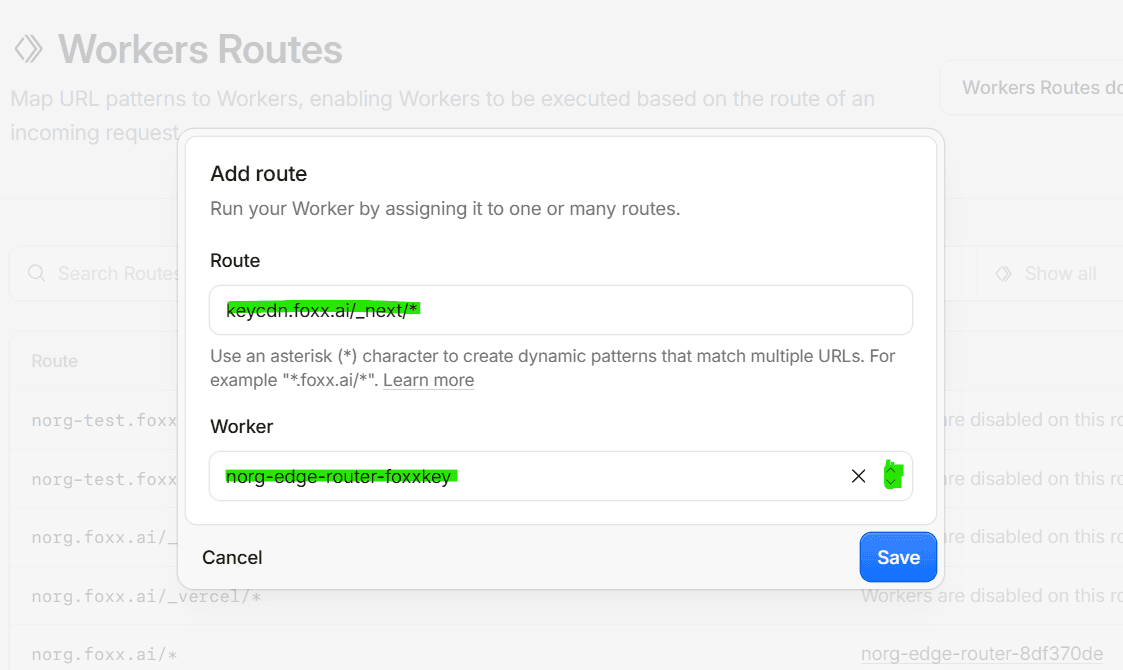
- Enter a path prefix as the Route, for example www.example.com/_next/*.
- Open the Worker dropdown and choose None, then Save.
- Repeat for each prefix your site serves assets from, such as /_next/*, /_vercel/* or /static/*.
Check the list afterwards: every exclusion should read Workers are disabled on this route, next to your one hostname/* route that names the worker.
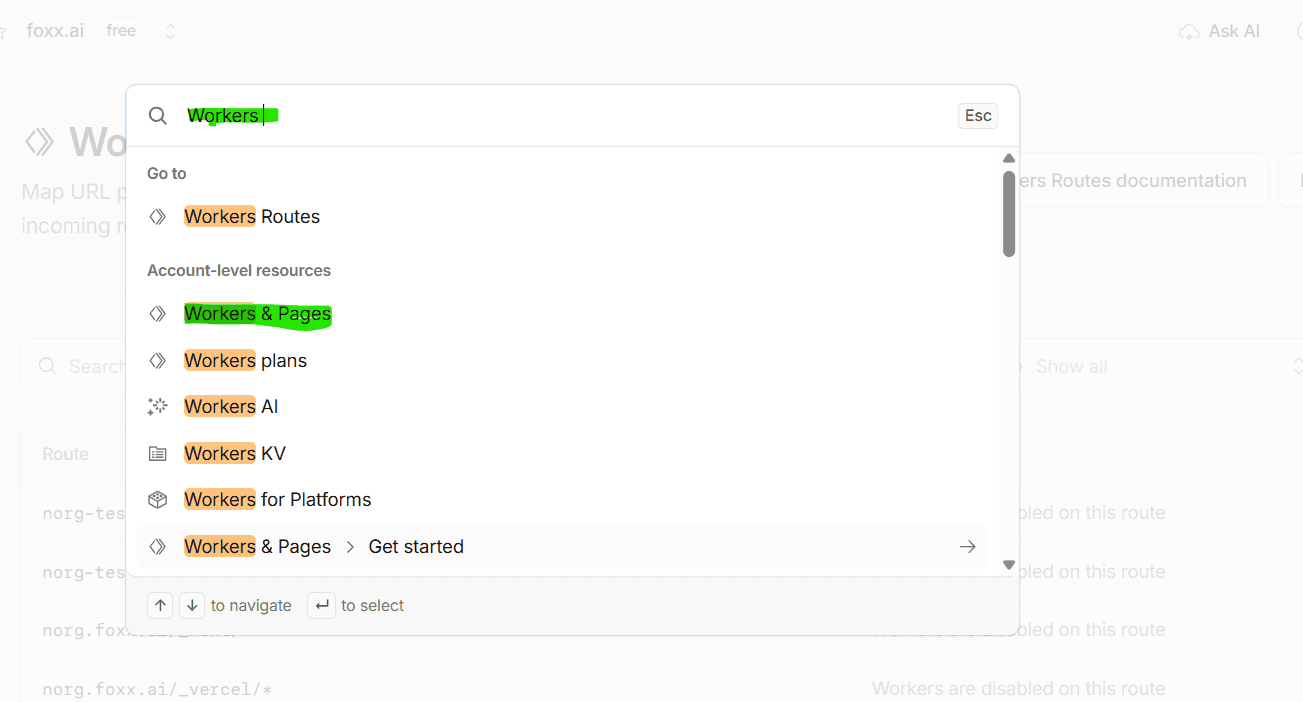
Ctrl/Cmd K, type Workers, pick Workers & Pages to get back to your worker. 5Test that it works
1. The normal site. Open your site in a browser. It must look and behave exactly as before.
A normal browser visit looks exactly as before.2. The AI mirror. Add ?agent=true to the address, for example https://www.example.com/?agent=true. It should load the NORG AI-optimised version of the page. If it still shows your normal page, the worker is not on the route yet: recheck the route and that the hostname is proxied.
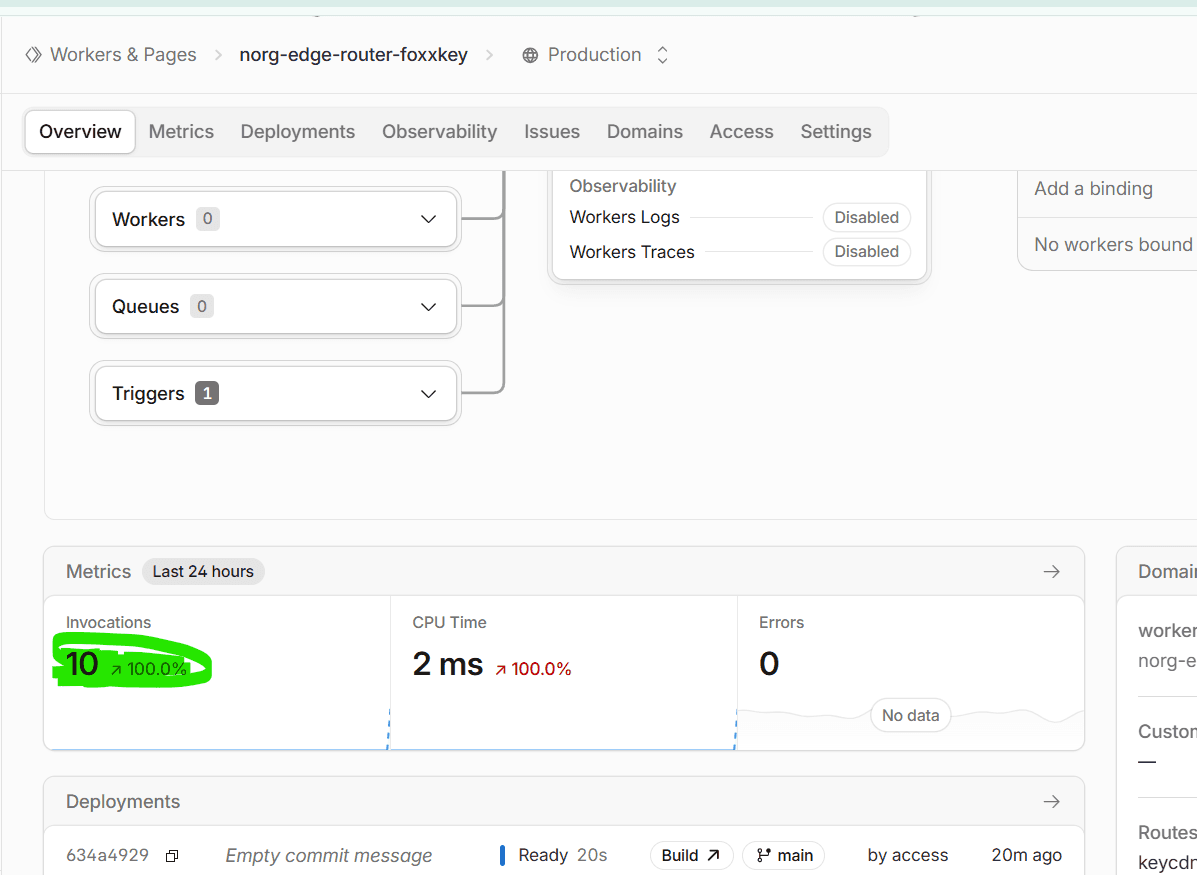
3. Invocations. Back in Cloudflare, open Workers & Pages, then your worker. The Invocations tile should now be above zero and rise as you reload the page. That confirms what you saw in the browser.
Invocations counts the requests the worker has handled. 6Turn on observability
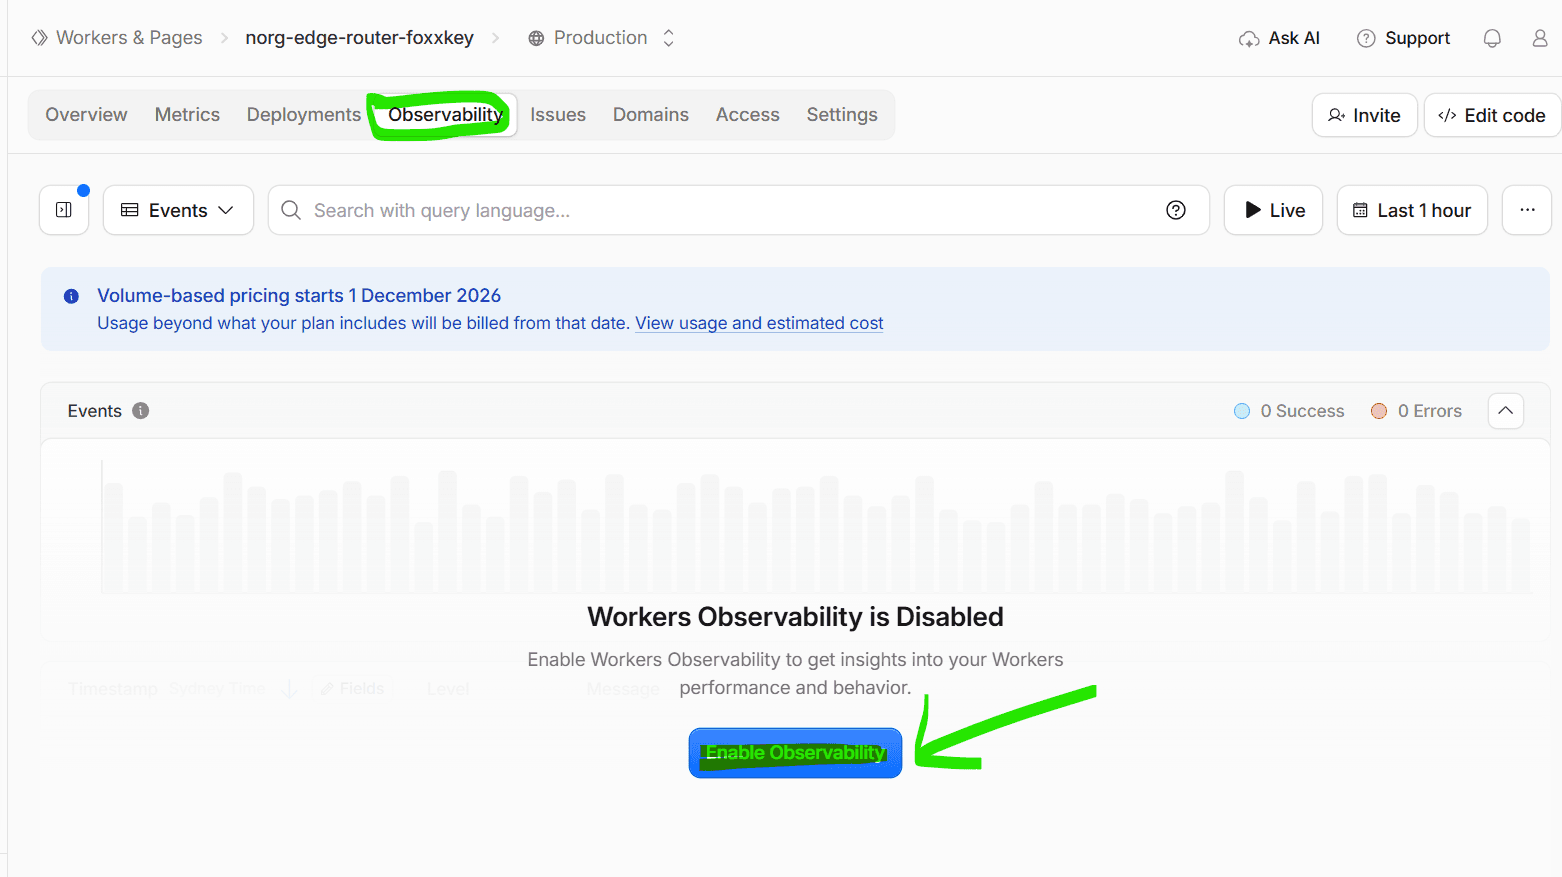
Open the worker's Observability tab and click Enable Observability. Logs then show every request the worker handles, which is the quickest way to see what it is doing.
Observability tab, then Enable Observability.- Free plan: we recommend enabling it. There is a daily cap on logs, and events past it are dropped rather than billed.
- Paid plan: enable it, but watch the cost. Each request is a log event and logs beyond the plan's allowance are billed, so a busy site adds up. Lower the sampling rate to cap it, and check Cloudflare's current Workers pricing.
- Switch it off once the install has run smoothly for about a month. The worker keeps working without logging.
© 2026 NORG.ai · Help & guides
Images on This Page
-
https://app.norg.ai/_next/image?url=%2Fhelp%2Fcloudflare-deploy%2F25-wrangler-login.png&w=3840&q=75
Wrangler asking to access your Cloudflare account
-
https://app.norg.ai/_next/image?url=%2Fhelp%2Fcloudflare-deploy%2F26-wrangler-authorize.png&w=3840&q=75
Wrangler permissions review with an Authorize button
-
https://app.norg.ai/_next/image?url=%2Fhelp%2Fcloudflare-deploy%2F28-wrangler-granted.png&w=3840&q=75
Authorization granted to Wrangler
-
https://app.norg.ai/_next/image?url=%2Fhelp%2Fcloudflare-deploy%2F27-wrangler-timeout.png&w=3840&q=75
Browser error: localhost refused to connect on the Wrangler OAuth callback
-
https://app.norg.ai/_next/image?url=%2Fhelp%2Fcloudflare-deploy%2F29-wrangler-terminal-retry.png&w=3840&q=75
Terminal showing a Wrangler login timeout, then a successful second login
-
https://app.norg.ai/_next/image?url=%2Fhelp%2Fcloudflare-deploy%2F30-wrangler-jsonc-file.png&w=1920&q=75
Folder listing of the cloned repository with wrangler.jsonc highlighted
-
https://app.norg.ai/_next/image?url=%2Fhelp%2Fcloudflare-deploy%2F31-wrangler-jsonc-site-id.png&w=1920&q=75
wrangler.jsonc with the SITE_ID line circled
-
https://app.norg.ai/_next/image?url=%2Fhelp%2Fcloudflare-deploy%2F32-wrangler-deploy-output.png&w=2048&q=75
Terminal output of a successful npx wrangler deploy
-
https://app.norg.ai/_next/image?url=%2Fhelp%2Fcloudflare-deploy%2F33-wrangler-secret.png&w=3840&q=75
Terminal output of npx wrangler secret put NORG_SITE_KEY
-
https://app.norg.ai/_next/image?url=%2Fhelp%2Fcloudflare-deploy%2F14-domains-add-route.png&w=3840&q=75
Domains tab with Add Route highlighted
-
https://app.norg.ai/_next/image?url=%2Fhelp%2Fcloudflare-deploy%2F15-add-route-dialog.png&w=1920&q=75
Add Route dialog
-
https://app.norg.ai/_next/image?url=%2Fhelp%2Fcloudflare-deploy%2F16-failed-to-add-domain.png&w=1920&q=75
Failed to add domain error
-
https://app.norg.ai/_next/image?url=%2Fhelp%2Fcloudflare-deploy%2F17-route-added.png&w=3840&q=75
Route listed under Custom Domains and Routes
-
https://app.norg.ai/_next/image?url=%2Fhelp%2Fcloudflare-deploy%2F19-zone-add-route.png&w=3840&q=75
Zone Workers Routes page with Add route highlighted
-
https://app.norg.ai/_next/image?url=%2Fhelp%2Fcloudflare-deploy%2F20-exclusion-route-worker-none.png&w=3840&q=75
Add route dialog for an exclusion
-
https://app.norg.ai/_next/image?url=%2Fhelp%2Fcloudflare-deploy%2F21-search-workers-pages.png&w=3840&q=75
Dashboard quick search for Workers & Pages
-
https://app.norg.ai/_next/image?url=%2Fhelp%2Fcloudflare-deploy%2F22-site-in-browser.png&w=3840&q=75
The customer site loading normally
-
https://app.norg.ai/_next/image?url=%2Fhelp%2Fcloudflare-deploy%2F23-invocations.png&w=3840&q=75
Worker overview showing invocations
-
https://app.norg.ai/_next/image?url=%2Fhelp%2Fcloudflare-deploy%2F24-enable-observability.png&w=3840&q=75
Observability tab with Enable Observability
-
https://app.norg.ai/_next/image?url=%2Flogos%2Fnorg-logo.png&w=3840&q=75
NORG.ai